Document Scanning with GNU/Linux
Way back in the year 2000, the US Congress passed the E-SIGN Act which legitimizes the use of electronic documents for any purpose within interstate commerce. Shortly thereafter, 49 of the 50 US states enacted similar legislation (UETA) to permit electronic documents within their own borders.. Therefore, it behooves both businesses and private individuals to eliminate the use of paper for both document production and storage.
For already existing paper documents, scanning into electronic format is the desirable and sensible method of incorporating such documents into an archival storage and retrieval system.
GNU/Linux, as I shall hopefully demonstrate, is an excellent platform for archival scanning.
Keep in mind that the goal for archival scans is not the extremely high resolution and absolutely faithful capture of paper documents in digital form. Although there are many cases for highly accurate scanning, the goal here is to create digital files that are as small in size as possible while yet retaining adequate resolution for later reproduction in print form. In an archival system containing potentially millions of documents, highly efficient scanning, processing, and compression to produce small file sizes are mandatory.
The tools used to achieve this goal are all GNU/Linux FOSS programs:
- SANE: Interface to the digital scanner
www.sane-project.org - NetPBM: Image conversion and dithering/thresholding
netpbm.sourceforge.net - JBIG2ENC: File compression and packaging to PDF
github.com/agl/jbig2enc - Djvulibre: File compression
djvu.sourceforge.net/ - JBIG-KIT: File compression
www.cl.cam.ac.uk/~mgk25/jbigkit
All these tools are command-line driven and this allows their easy incorporation into versatile scripts, either with bash, perl, or graphical scripts like Tk/Tcl. I shall employ a simple bash script to illustrate the overall method but the user is certainly free to develop more complex schemes.
The basic workflow is outlined as follows:
- 1). Scan all material as 300 dpi 8-bit grayscale. This resolution/depth has been determined, through trial and error, to give the best final accuracy of detail with reasonably small file sizes.
- 2). Either dither or threshold the original grayscale scan to bitonal (black & white). Several methods are compared.
- 3). Compress the resulting bitonal image file. Several methods are compared.
- 4). Package the resulting compressed image file within a PDF format for archival storage.
Scanning the Document
SANE supports lots of scanners but certainly not all. Consult the list of supported models at this link: SANE Devices.
The scanner I use for this demo is an HP-6200C (USB) which by today's fast-paced standards is considered somewhat ancient but under SANE is it perfectly serviceable.
First, find the specific device name for the attached scanner. This is accomplished with either of the following commands:
	scanimage -L
	sane-find-scanner
Second, determine all options that are specific to the scanner. Using the HP-6200C the command for this is:
scanimage --help --device-name hp:libusb:major:minor
This command will output a LONG list of available options, the most important of which are the mode, resolution, gamma-table, and depth.
Here is the output for the HP-6200C:
  Scan Mode:
    --preview[=(yes|no)] [no]
        Request a preview-quality scan.
    --mode Lineart|Halftone|Gray|Color [Lineart]
        Selects the scan mode (e.g., lineart, monochrome, or color).
    --resolution 12..1600dpi (in steps of 1) [300]
        Sets the resolution of the scan.ned image.

  Enhancement:
    --brightness -127..127 (in steps of 1) [0]
        Controls the brightness of the acquired image.
    --contrast -127..127 (in steps of 1) [0]
        Controls the contrast of the acquired image.
    --auto-threshold[=(yes|no)] [no]
        Enable automatic determination of threshold for line-art scans.

  Advanced Options:
    --custom-gamma[=(yes|no)] [no]
        Determines whether a built-in or a custom gamma-table should be used.
    --gamma-table 0..255,... (in steps of 1.52588e-05) [inactive]
        Gamma-correction table.  In color mode this option equally affects the
        red, green, and blue channels simultaneously (i.e., it is an intensity
        gamma table).
     --matrix-type Auto|NTSC Gray|Red|Green|Blue [Auto]
        Set the scanner's color matrix.
    --matrix-rgb -3.99219..3.99219,... (in steps of 1.52588e-05) [inactive]
        Custom color matrix.
    --halftone-pattern Coarse|Fine|Bayer|Vertical|Horizontal|Custom [inactive]
        Defines the halftoning (dithering) pattern for scanning halftoned
        images.
    --speed Auto|Slow|Normal|Fast [Auto]
        Determines the speed at which the scan proceeds.
    --depth 1 [inactive]
        Number of bits per sample, typical values are 1 for "line-art" and 8
        for multibit scans.
    --output-8bit[=(yes|no)] [inactive]
        Use bit depth greater eight internally, but output only eight bits.
    --source Normal|XPA [Normal]
        Selects the scan source (such as a document-feeder).
    --button-wait[=(yes|no)] [no]
        Wait to scan for front-panel button push.
    --lamp-off []
        Shut off scanner lamp.

   Geometry:
    -l 0..215.788mm (in steps of 1.52588e-05) [0]
        Top-left x position of scan area.
    -t 0..296.888mm (in steps of 1.52588e-05) [0]
        Top-left y position of scan area.
    -x 0..215.788mm (in steps of 1.52588e-05) [215.788]
        Width of scan-area.
    -y 0..296.888mm (in steps of 1.52588e-05) [296.888]
        Height of scan-area.
    --mirror-horizontal Off|On [Off]
        Mirror image horizontally.
    --mirror-vertical Off|On [Off]
        Mirror image vertically.
Again, most of the above options are not critical for basic scanning. The most important to specify are the mode, resolution, gamma-table, and depth.
The goal is to scan at 300 dpi resolution with 8-bit depth and a grayscale mode. Also, the gamma value, which for grayscale mode is essentially the brightness, is to be adjusted at 1.8 to 2.2. Through a few trial-and-error scans I have determined that a gamma of 1.8 gives good results with the HP-6100C and I use it throughout my scanning. Other brands of scanner require different values.
The SANE command, via scanimage, to accomplish the scan is shown next.
Note that the gamma value for a grayscale image is set by supplying identical values to each of the red/green/blue gamma tables, and that the gamma value is specified through the output of the gamma4scanimage command (see the man page for details). This may seem a bit awkward but I prefer to set gamma rather than brightness since the gamma method (a log scale) is more natural to human visual perception.
	scanimage -p -d hp:libusb:major:minor --format pnm --mode Gray --depth 12 \
	--resolution 300 --speed="Normal" --output-8bit="no" \
	--source Normal \
	--custom-gamma="yes" \
	--gamma-table `gamma4scanimage 1.8 0 255 255 255` \
	> output_file.pgm
The command produces an output file in the PNM format, which is the standard Unix "anymap" image format. The grayscale type of PNM is called PGM. This format is simple and uncompressed and serves as a good intermediary for subsequent processing, especially considering that we are using the netpbm suite of image tools.
Note also that in this case, with the HP 6200C, the scan actually has a 12-bit depth. In subsequent processing this will be reduced to 8-bits. For scanners not capable of 12-bit scans, using 8-bits initially will be the norm.
Example Scan
Obviously, the HTTP protocol cannot transmit actual paper documents. The only way for me to present the original paper document that I used for the subsequent examples is to provide a high resolution color scan. The original 8.5" X 11" paper document was scanned at 600dpi with 8-bit RGB color. A color profile, specific to the HP 6200C, was used to faithfully reproduce the document colors.
This original paper color document was then scanned at 300 dpi, 8-bit depth grayscale, using the above SANE command, to create a starting PGM format file for subsequent processing.
The original document and the SANE grayscale scan are shown side-by-side:

(click to view full size)
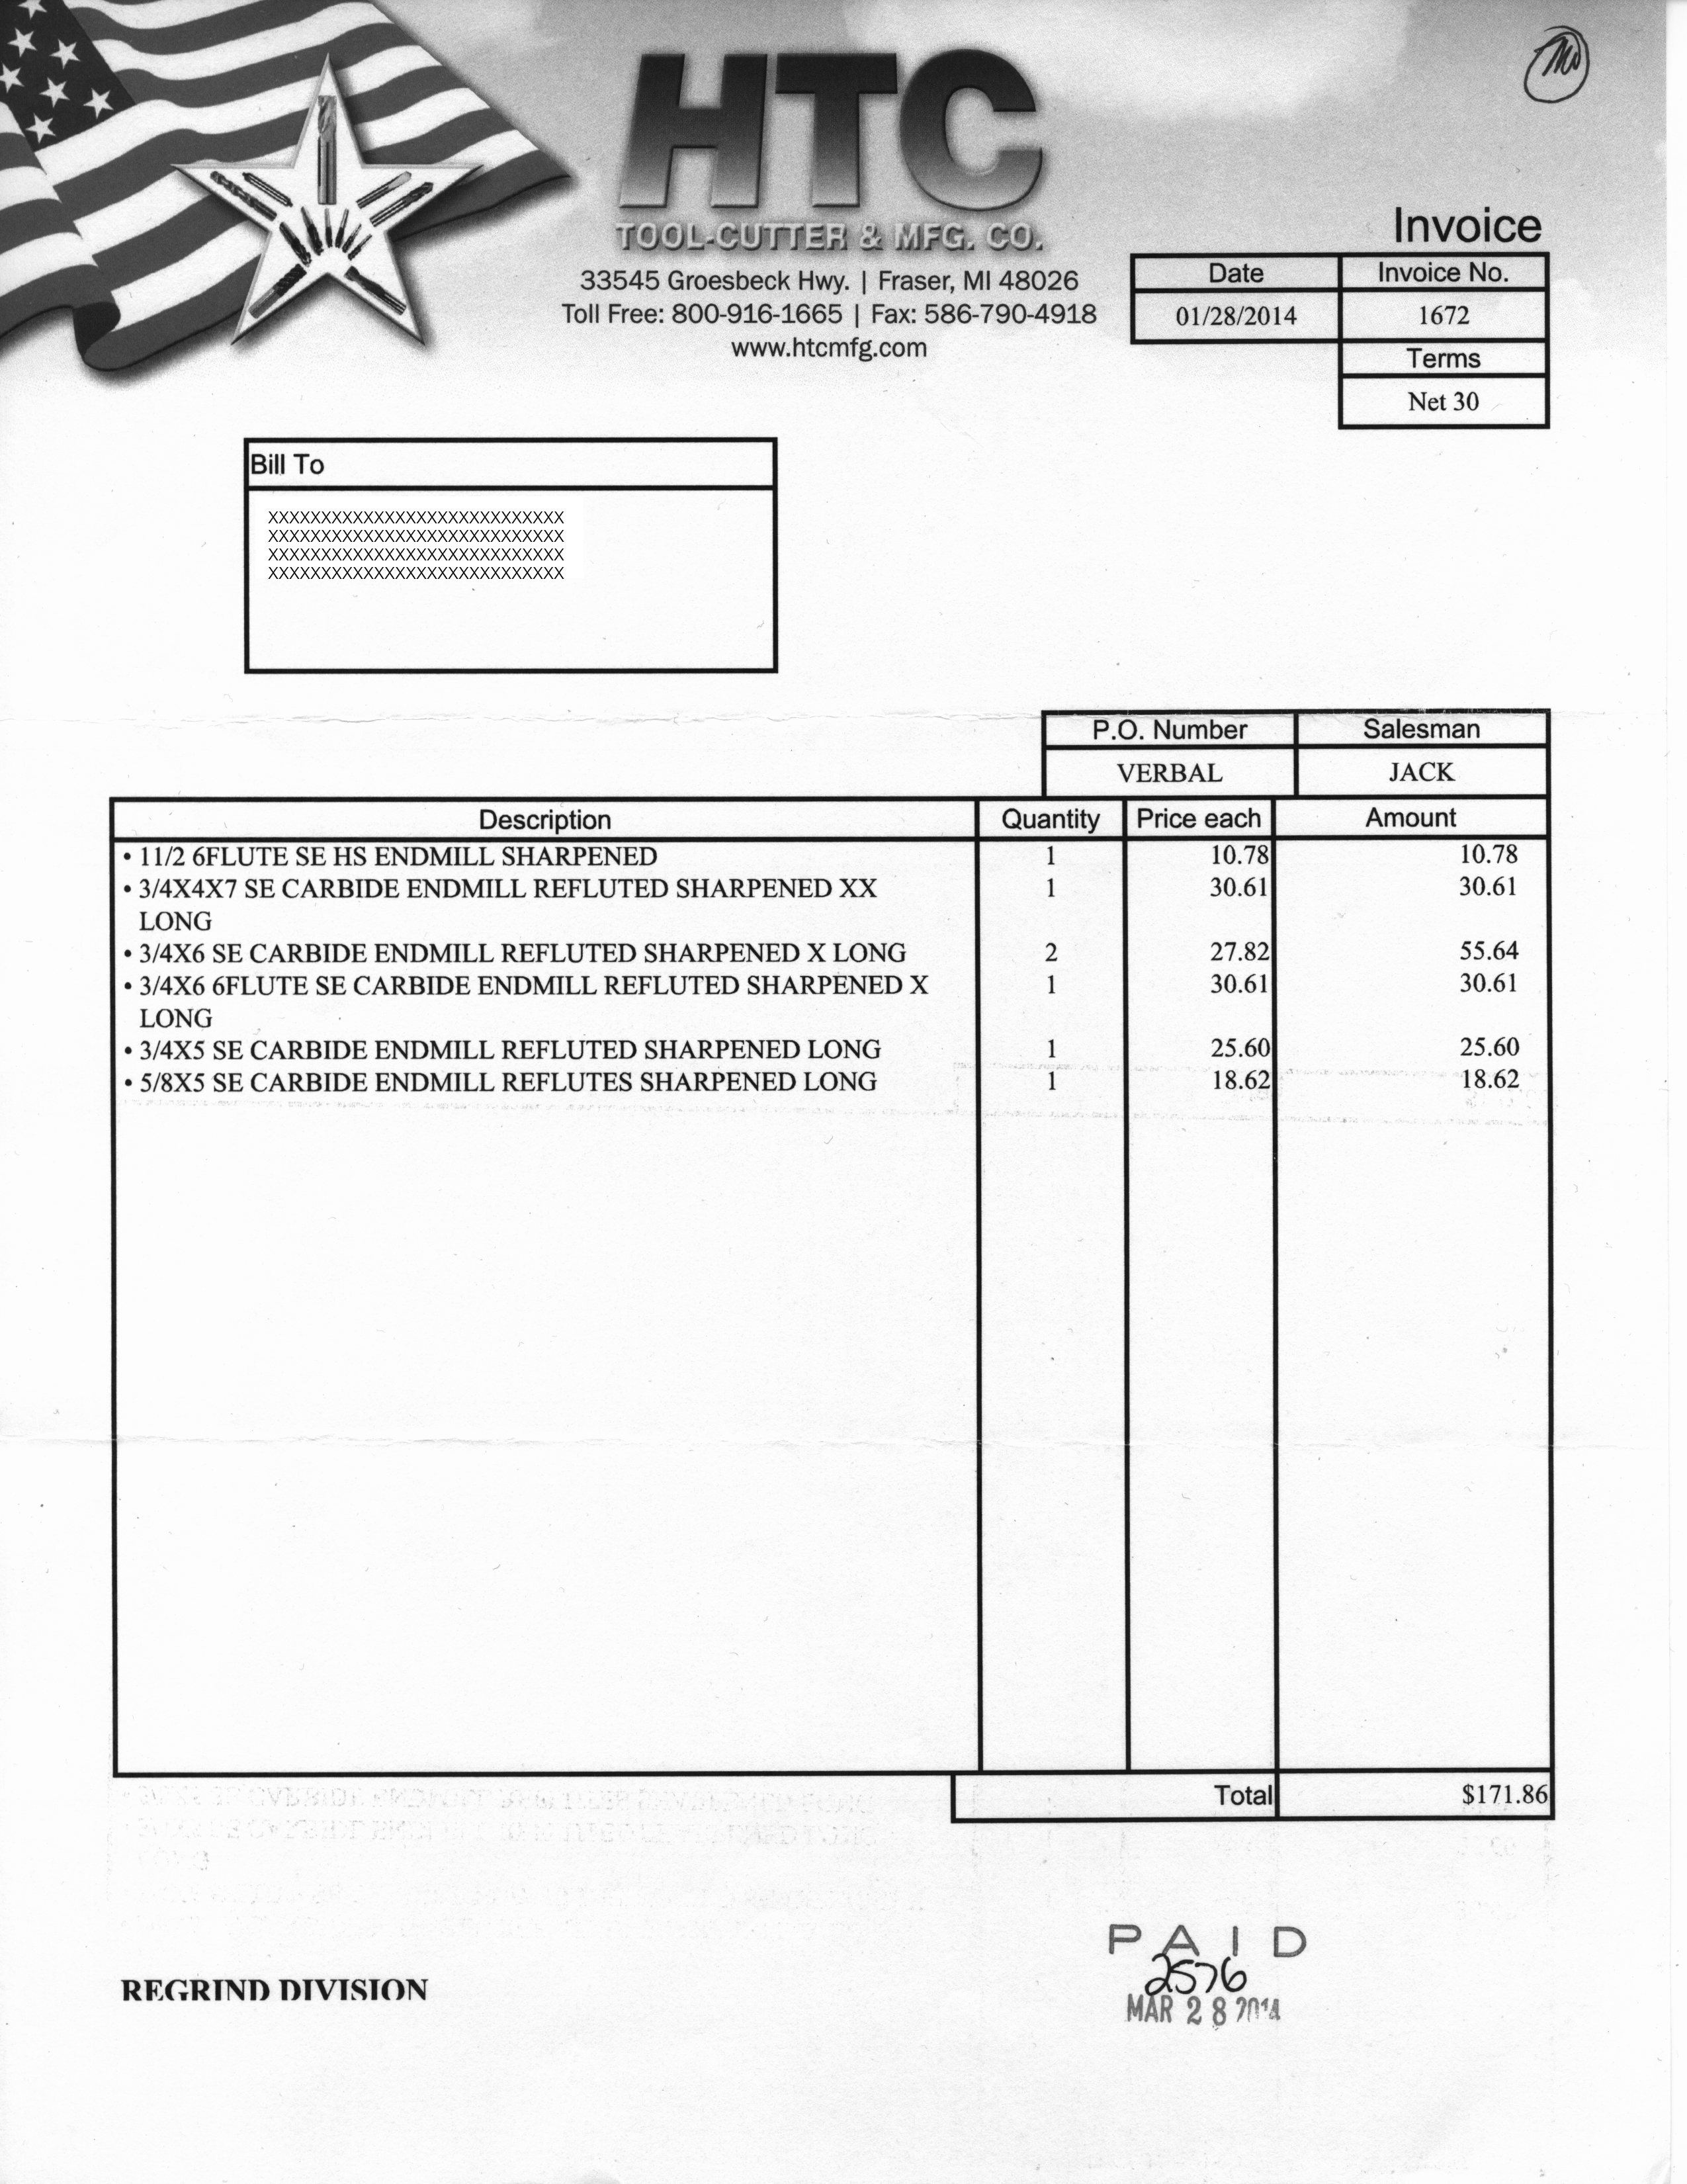
(click to view full size)
The digital grayscale scan represents a faithful reproduction of the original but, as already mentioned, it is far too large (2550x3300 = 8415000 = 8.4Mb) for archival storage. As a first step, we need to either dither or threshold this grayscale scan to a bitonal (b/w) image. Then, the bitonal image needs to be further compressed and finally packaged as a PDF.
Shown next are the results of two different dithering algorithms (Floyd-Steinberg and Atkinson) and an interactive thresholding technique. File sizes are also given. The specific netpbm commands used are listed here, with the PGM grayscale file name in the bash $file: variable:
	# Iterative Thresholding
	pamthreshold $file | pnmtopnm > ${file%.pgm}thr.pbm

	# Floyd-Steinbeg Dithering
	pamditherbw -floyd $file | pamtopnm > ${file%.pgm}fs.pbm

	# Atkinson Dithering
	pamditherbw -atkinson $file | pamtopnm > ${file%.pgm}atk.pbm
Both dithering methods preserve the shades of the logos pattern and Floyd-Steinberg also preserves the slight color cast of the original as a fine distribution of "dots." With thresholding, the details of the logos are not preserved but since the logos contains no relevant information this is perfectly acceptable.
(click to view full size)
(click to view full size)

(click to view full size)
Compression Algorithms
The file size of the dithered/thresholded PBM bitonal images are still too large (1053030 = 1.1Mb). Consequently, a final compression step is necessary.
Thee different compression methods, jbig, jbig2, and dejavu, on each image are now performed. The respective commands are as follows (again, the bash "$file" variable contains the PBM file name):
	# Jbig compression (from netpbm utilities)
	pbmtojbg -q $file ${file%.pbm}.jbg

	# Jbig2 compression (from jbig2enc)
	jbig2 -s $file > ${file%.pbm}.jb2

	# Dejavu compression (from djvulibre utilities)
	cjb2 -dpi 300 -lossless $file ${file%.pbm}.djv
The resulting file sizes (in bytes) are now listed:
| Type | Jbig | Jbig2 | Dejavu |
|---|---|---|---|
| Atkinson | 91269 | 106305 | 104992 |
| Floyd-Steinberg | 293924 | 342379 | 3115330 |
| Threshold | 32172 | 28253 | 29738 |
Based on these results, it is obvious that iterative thresholding with jbig2 compression produces the smallest bitonal file size with an adequate preservation of the original detail, and it thus becomes the recommended method for archival document scanning.
Final Packaging
The resulting bitonal, compressed image file can be stored as is. The files can be readily viewed or printed with available utilities. However, it is useful to package the resulting image file within a PDF format file for ease of exchange as PDF is a widely recognized format. Keep in mind that this final packaging is purely optional.
The tool used here for PDF packaging is a python script, jbig2topdf.py, that is from the JBIG2ENC suite whose link is provided above. Given a PBM bitonal, compressed image in "$file" the packaging commands are as follows (consult the source of jbig2topdf.py for a description):
	jbig2 -s -p $file
	python jbig2topdf.py output > ${file%.pbm}.pdf
	rm output*
Caveat: The jbig2topdf.py script is a quick and dirty utility and lacks command-line options. The user should be sure to set the dpi value, which defaults to 72 dpi, to match the chosen scanner resolution. This is done by manually editing line 31: "dpi = xxx".
Now we have a PDF file containing the compressed bitonal rendition of the original paper document that can be stored, viewed, printed, and exchanged to serve a variety of purposes. Furthermore, the compressed image can be extracted form the PDF at will.
Bash Script for Automation
All of the above commands to scan and process the original paper document can be grouped in a bash script for an automation of the entire process. Here is but one simple example of a bash script to accept a PDF file name and then scan and produce the final PDF. Another important parameter, a threshold cutoff value, is also given as an option. This cutoff value allows the "brightness" of the resulting image to be finely adjusted.
	#! /bin/bash
	# HP6200C
	# scans to 12-bit 300dpi gray scale pgm,
	# thresholds, and converts to JBIG2 in PDF
	# usage: doc2pdf.sh file.pdf gamma 00x 00y

	gamma=$2
	outfile=$1
	THRS=$3
	major=$4
	minor=$5

	scanimage -p -d hp:libusb:$major:$minor --format pnm --mode Gray --depth 12 \
		--resolution 300 --speed="Normal" --output-8bit="no" \
		--source Normal \
		--custom-gamma="yes" \
		--gamma-table `gamma4scanimage $gamma 0 255 255 255` \
		| pamthreshold -simple -threshold=$3 | pnmtopnm > ${outfile%.pdf}.pbm

	# with "-p" output is to "output*" files
	jbig2 -s -p ${outfile%.pdf}.pbm
	python jbig2topdf.py output > $outfile
	rm output*
	rm ${outfile%.pdf}.pbm
The above procedure and commands apply to a single page scan. To package a multi-page scan into a PDF just create several PBM files from scans as outlined above and using the scanimage --batch option. The individual files are then assembled as follows:
	jbig2 -s -p image1.pbm image2.pbm ...

	python jbig2topdf.py output > out.pdf
Epilogue
The reader is encouraged to explore further the possibilities offered by GNU/Linux/FOSS image processing utilities. In conjunction with bash or other scripting languages a wide variety of processing tasks can be highly customized and automated. The power of GNU/Linux, IMO, lies in the great utility offered by user programming.