Automated RAW Processing with GNU/Linux
For those who enjoy exploring the technical aspect of things, processing camera RAW images "from scratch" can be both enlightening and very rewarding.
GNU/Linux FOSS provides a variety of tools for fundamental image processing. In this demo I will employ bash pipelines to completely automate the processing of a RAW image using NetPBM and other tools. Although the method shown here is limited the Nikon D100 RAW format, it can be altered to accommodate any other RAW format.
The tools used to achieve this goal are all GNU/Linux FOSS programs:
RAW processing with GNU/Linux would not be possible without the great contribution of David Coffin. His dcraw program is able to handle most of the commercial RAW formats and it also serves as the basis for the libraw project. Mr. Coffin is truly one of the unsung heroes of the FOSS world.
Unfortunately, development of dcraw seems to have stopped in 2018. For this reason, even though the dcraw code is still fully functional, I have chosen to use the dcraw_emu program that is contained in the libraw package.
But although dcraw, or its libraw emulator, is certainly able to effect complete RAW processing on its own, I will be using it only as a starting point. I have chosen to take a more fundamental approach and I will resort to a variety of tools to complete the job.
The GNU/Linux FOSS software used is listed here:
- LibRaw: RAW file processing with a variety of options
libraw.org - NetPBM: Basic image processing
netpbm.sourceforge.net - GMIC: Basic image processing
gmic.eu - LCMS: Color space transformations
www.littlecms.com - EXIV2: Read/write/display image metadata (tags)
exiv2.org
The most critical aspect to RAW processing is the application of an ICC color profile. Commercial DSLR vendors keep their camera profiles a proprietary secret but in many cases it is possible to obtain a profile from another source. Many web sites post camera profiles for various DSLR models. It is also possible to create a profile "from scratch" using LPROF or the Argyll CMS.
For the Nikon D100 I have acquired the ICC profile from their commercial software. Since it is proprietary in nature I unfortunately cannot post a copy of it on this site but the Ufraw website could be of help to those who are interested.
The RAW Auto Process Method
What follows is a line-by-line commentary of a bash shell script that will automate the complete processing of a Nikon D100 RAW file, and which, through appropriate substitutions, should be capable of doing the same to other RAW formats. I use this script to process sometimes hundreds of RAW files after a photo shoot. The end result is usually very close to the best possible outcome but there can be occasional "misses" that must be dealt with through manual, and hence tedious, editing.
The actual Nikon D100 RAW file for this demo used is publicly available at this web site to allow the user to compare my GNU/Linux/FOSS method to that of professional commercial software.
The GNU/Linux bash script, with line numbers, is shown next:
     1	#! /bin/bash
     2	# usage ./process_raw.sh file.nef sharpness
     3
     4	file=`basename $1`
     5	shrp=$2
     6
     7	dcraw_emu -v -c 0 -w -q 3 -g 1 0 -6 -o 0 -H 5 -Z - $file \
     8	| pnmhisteq -rmap nef_curve_lut_d100.pgm \
     9	| pnmgamma 2.2 > raw1.pnm
    10
    11	ppmtopgm raw1.pnm > raw1.pgm
    12	bval=`pamsumm -brief -min raw1.pgm`
    13	wval=`pamsumm -brief -max raw1.pgm`
    14
    15	pnmnorm -bvalue=$bval -wvalue=$wval -keephues raw1.pnm | pamtotiff -none -truecolor > raw2.tif
    16
    17	tificc -v -e -n -c 2 -t 0 -w 16 -b -i D100_Mode_2.icm -o sRGB.icm raw2.tif rawcc.tif
    18
    19	gmic rawcc.tif -rescale2d 50%,50%,6,1 -cut 0,65535 -unsharp 0.6,$shrp,0 -cut 0,65535 -o -.pnm \
    20	| pnmtojpeg -quality=90 -dct=float -sample 1x1 -optimize > ${file%.nef}.jpg
    21
    22	display ${file%.nef}.jpg &
    23	rm raw*
Now follows a line-by-line commentary. After each major processing step an example image of the result along with an associated histogram are shown.
Lines 1-5: The bash script takes two parameters, the NEF(RAW) file name and a numerical value for the unsharp mask. These initial lines set up the appropriate variables. Since a lot (most?) DLSRs use a low-pass, anti-aliasing filter in front of the sensor, the resulting images need to be slightly sharpened, and the unsharp filter is the best technique.
The image is now processed using a Unix pipeline, where the output of one command is used as the input to the next command. Using pipelines avoids a plethora of intermediate files and the associated storage access.
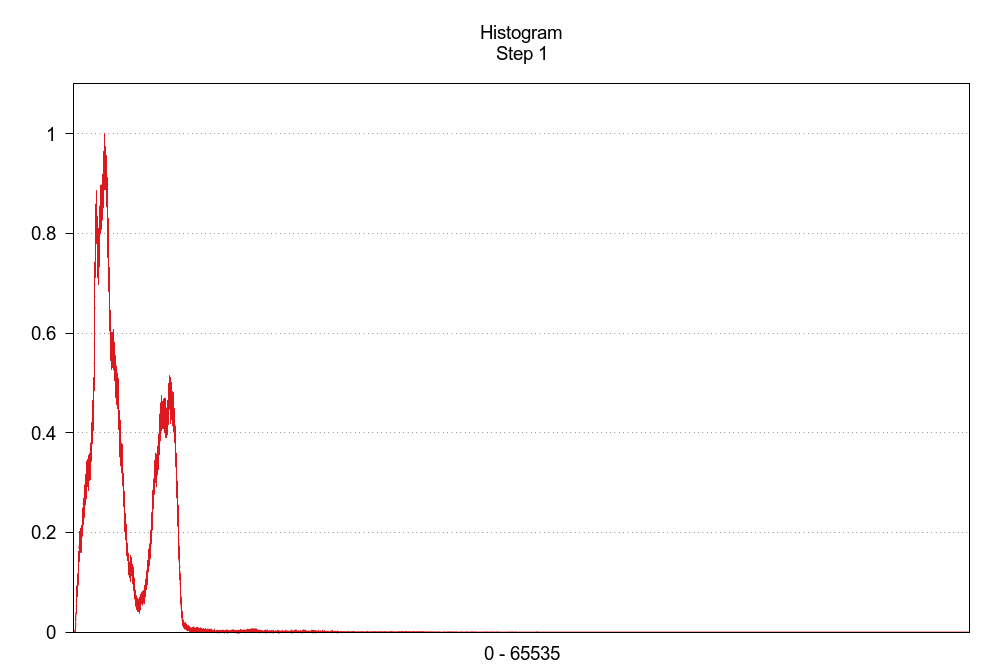
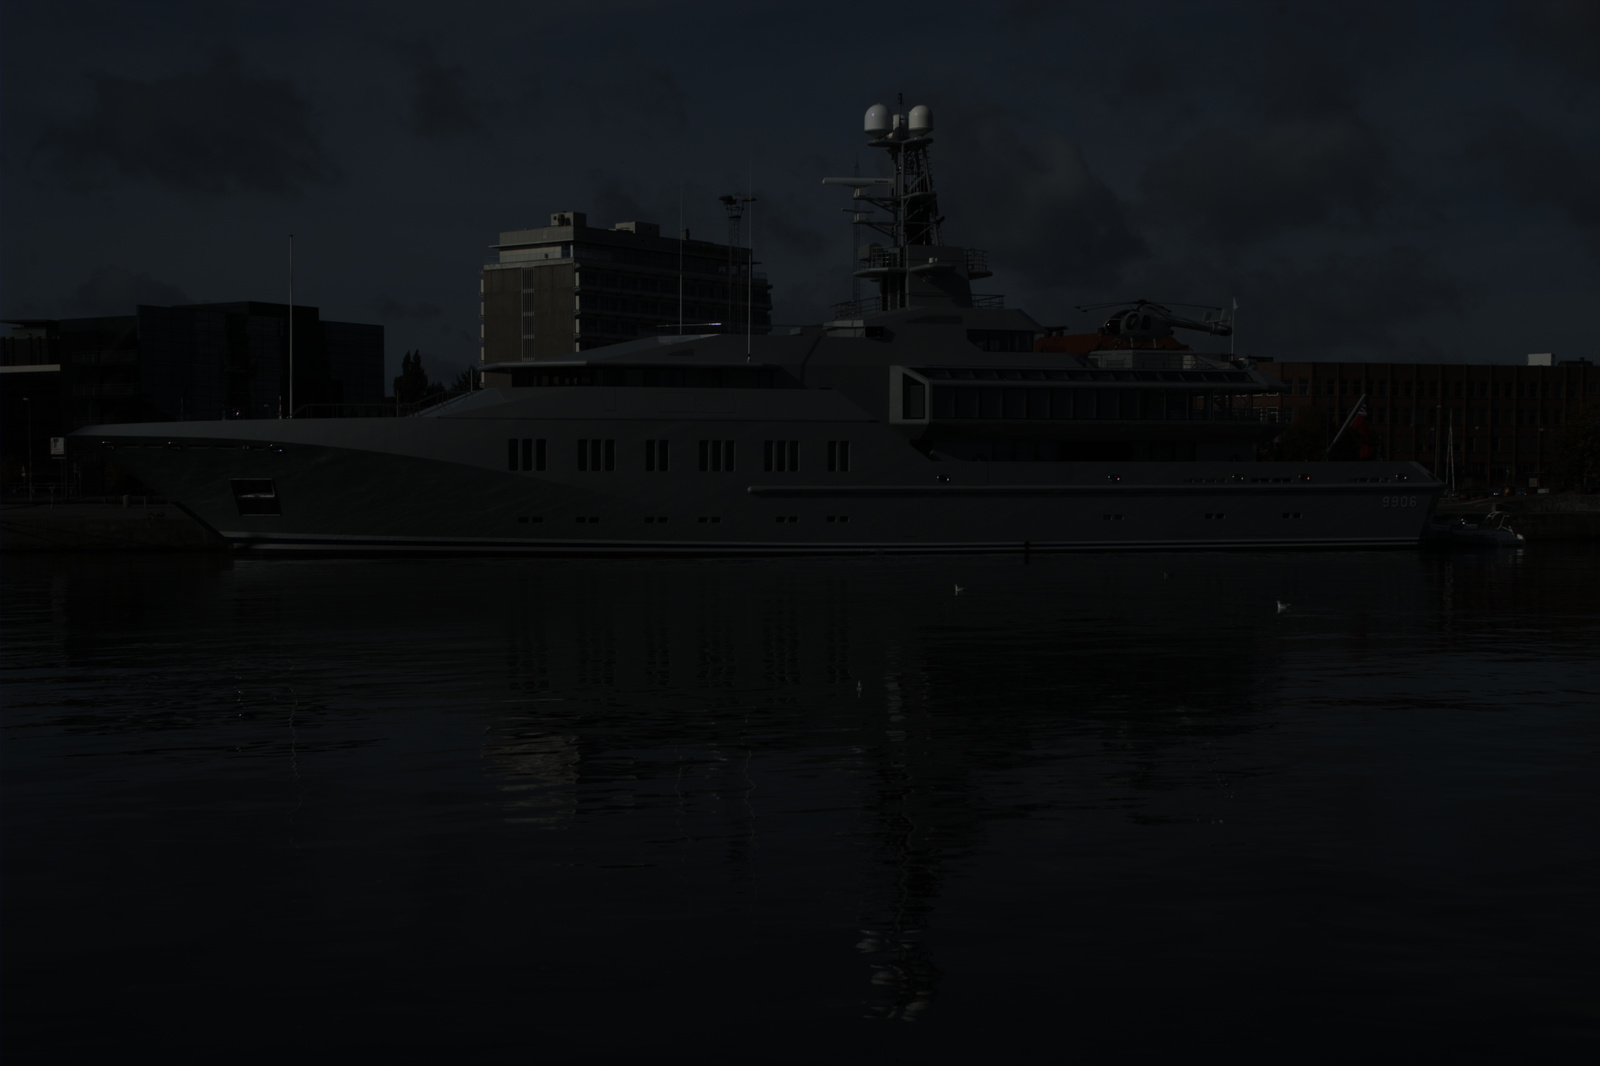
Line 7: Dcraw_emu does most of the heavy lifting. This single command accomplishes quite a lot (for the meaning of the various options check the dcraw man page and the dcraw_emu description for additional parameters). The raw image is interpolated with high quality AHD, the camera white balance multipliers are applied, a linear gamma (i.e. no change) is applied, and the image is output as a 16-bit depth PNM file while keeping the camera color space. A highlight reconstruction, which usually is not needed, is also indicated. This single dcraw command purposely excludes a more complete processing so that subsequent steps can better refine the image.
After this initial step the image, and its histogram are shown next. Keep in mind that the image data is within a linear luminosity space and has not yet been gamma corrected to accommodate human visual perception.
Note that the following images really need to be viewed at full size to fully appreciate the differences between the processing steps.
(click to view full size)
(click to view full size)
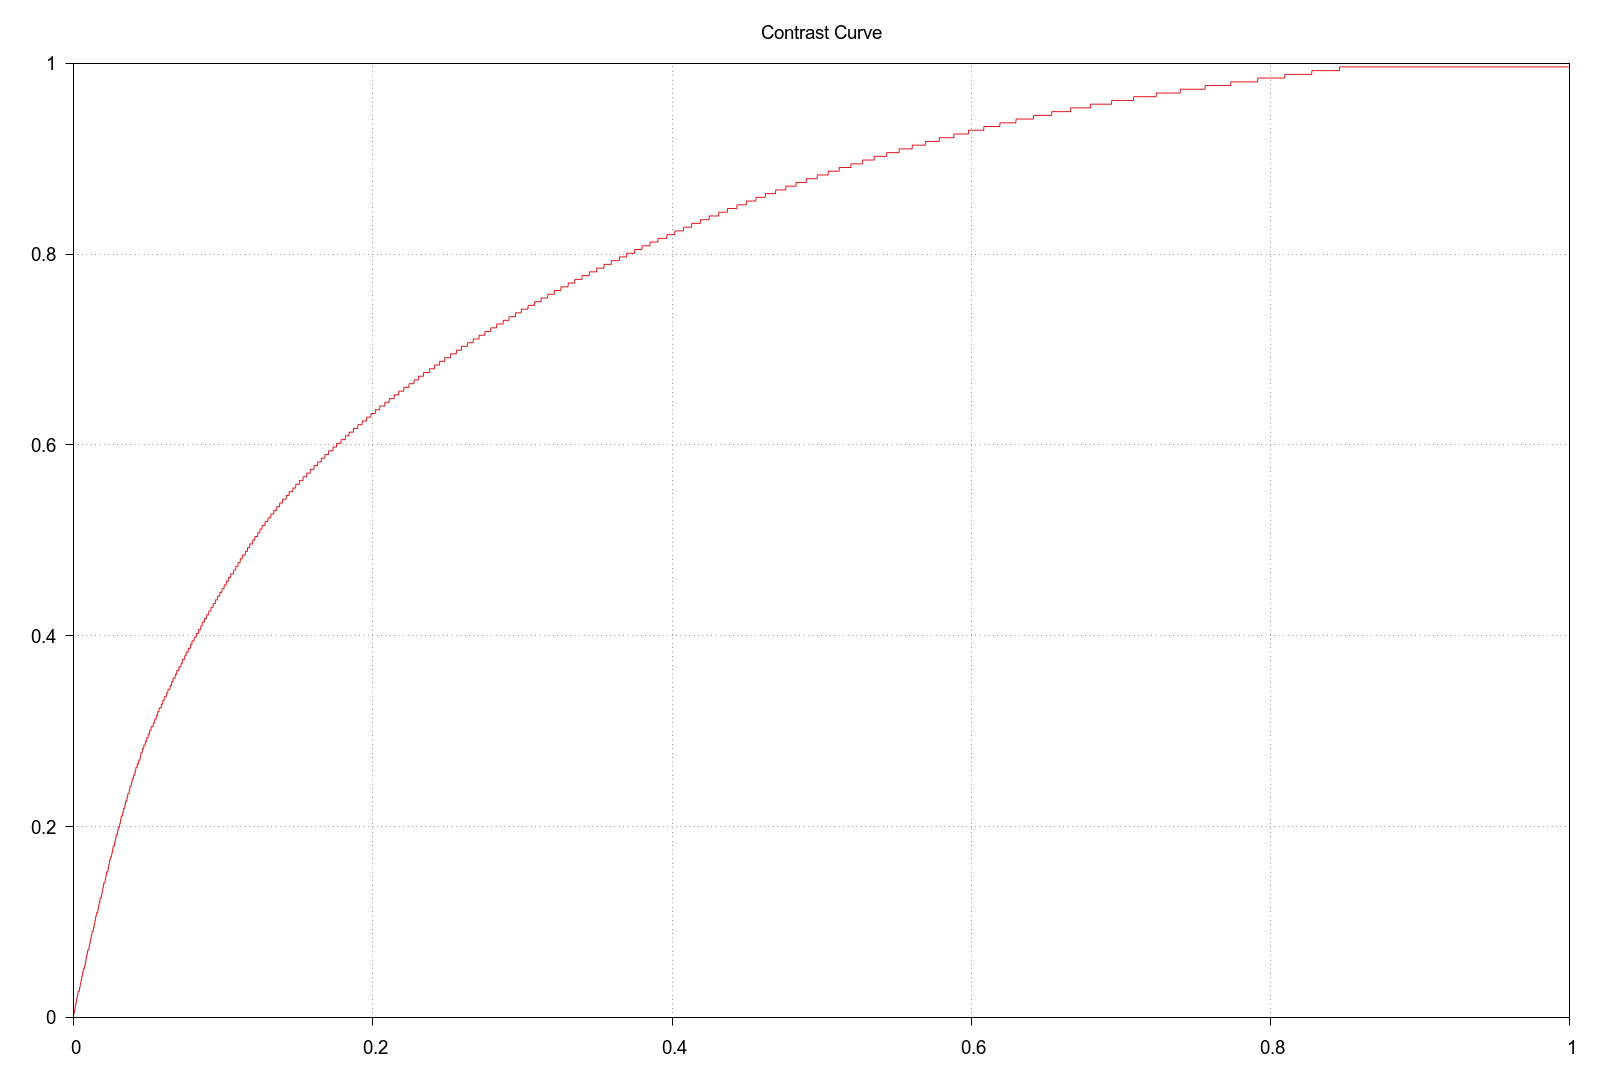
Line 8: The contrast of this image needs to be greatly enhanced. Another way of stating this is that the histogram needs to stretched and normalized. Modification of the image is done by applying a contrast curve followed by histogram normalization.
The D100 NEF file contains a contrast curve contained in the "ContrastCurve" image tag. It can be extracted using the Exiv2 utility. As a preliminary (i.e. not a part of this demo script), the extracted curve data, which consists of 4096 8-bit values, was scaled appropriately to fit a 65536 range and then made into a PGM file, here named "nef_curve_lut_d100.pgm." My own accessory C program was used to do this job. A link to the C source code is here. The programs uses splines (via the GNU Scientific Library) to fit the extracted data and then output a PGM file.
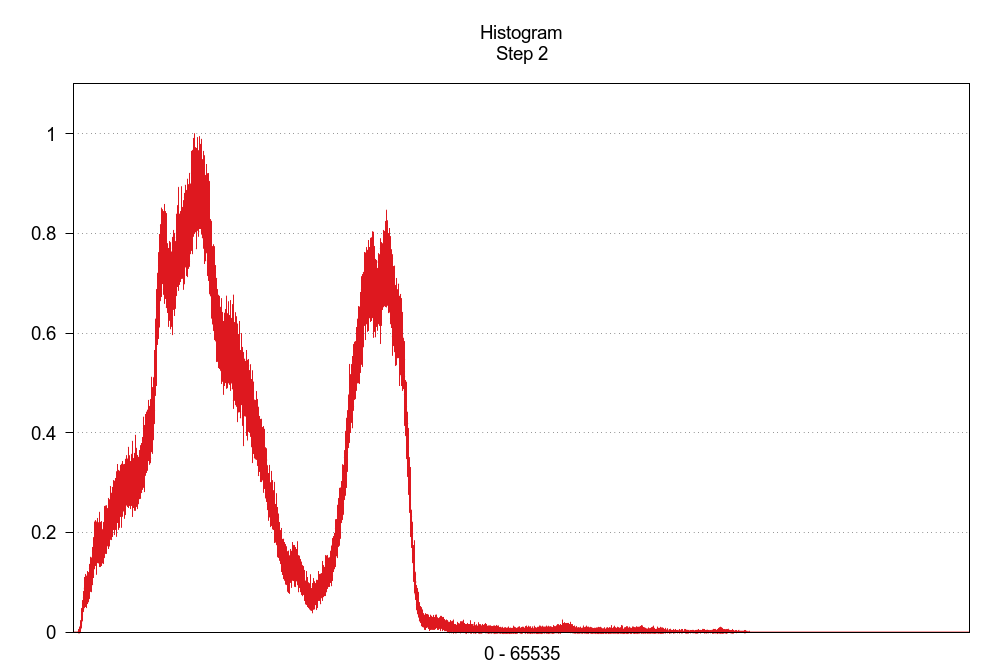
The curve is applied via the NetPBM utility pnmhisteq using the "-rmap" option. The resulting equalized image is then gamma corrected to a value of 2.2 using pnmgamma.
The result of all this processing is a contrast-stretched image that shows full detail. Note how the histogram resembles a normal (in the math sense) distribution of pixels across a broad depth range.
(click to view full size)
(click to view full size)
(click to view full size)
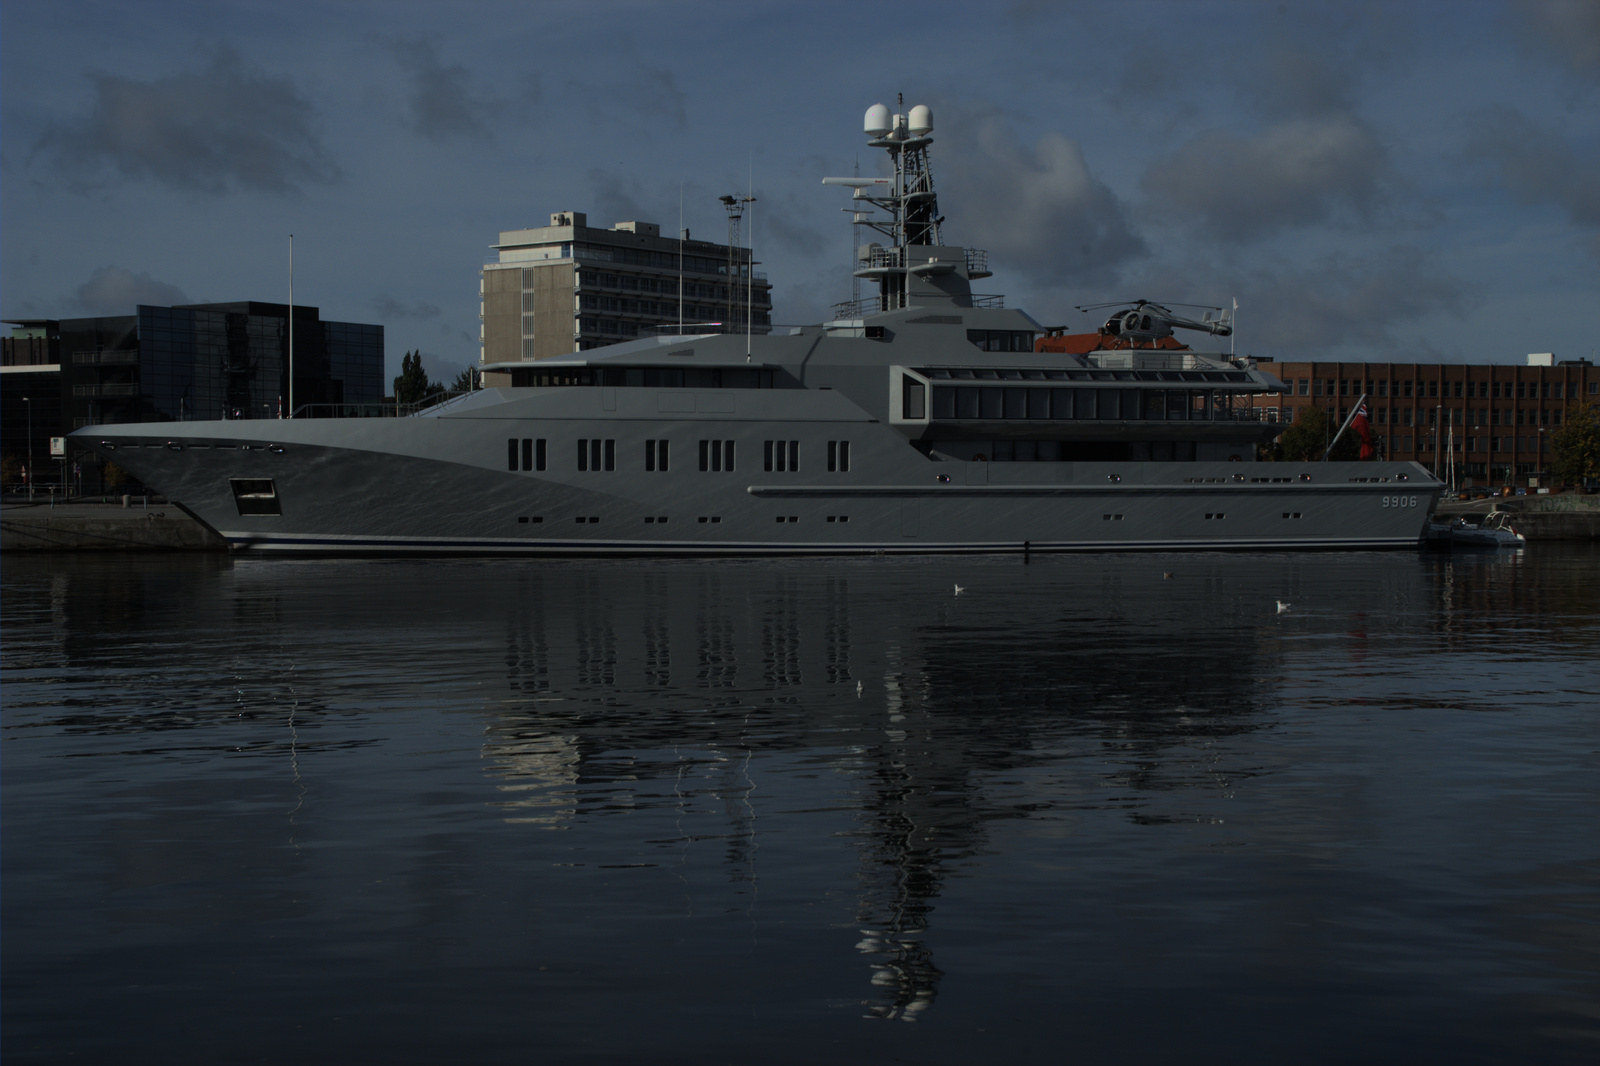
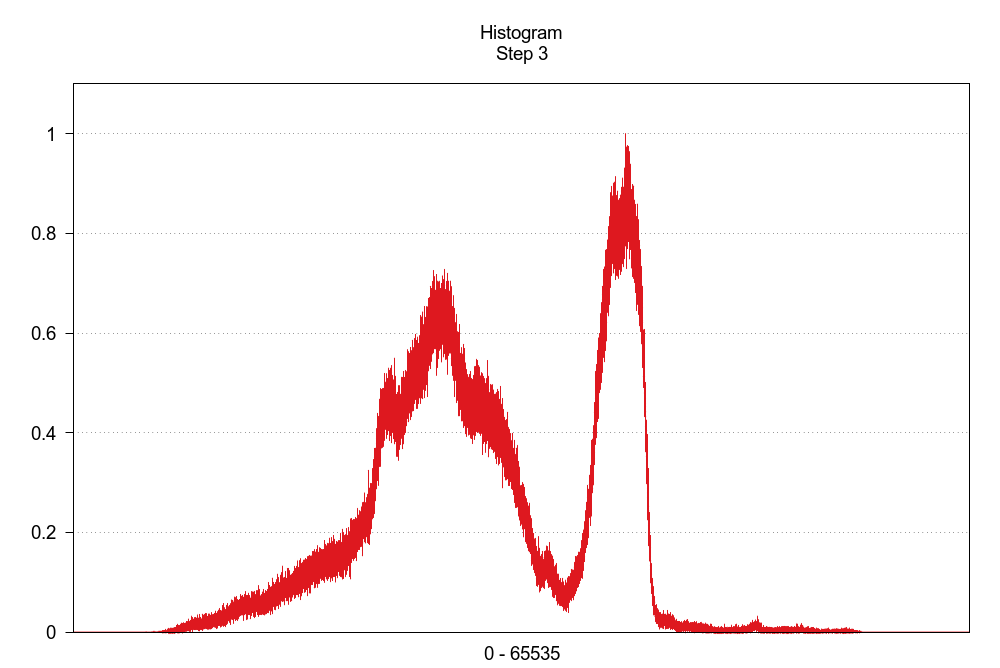
Line 9: Although the above stretching operation has noticeably improved the image, it still remains in a linear intensity space and thus appears much too dark. To accommodate human visual perception, which is logarithmic in nature, a gamma correction curve is applied. Note how following the gamma adjustment the image comes alive with an adequate brightness. Pnmgamma, from the NetPBM utilities, is used to effect this step.
(click to view full size)
(click to view full size)
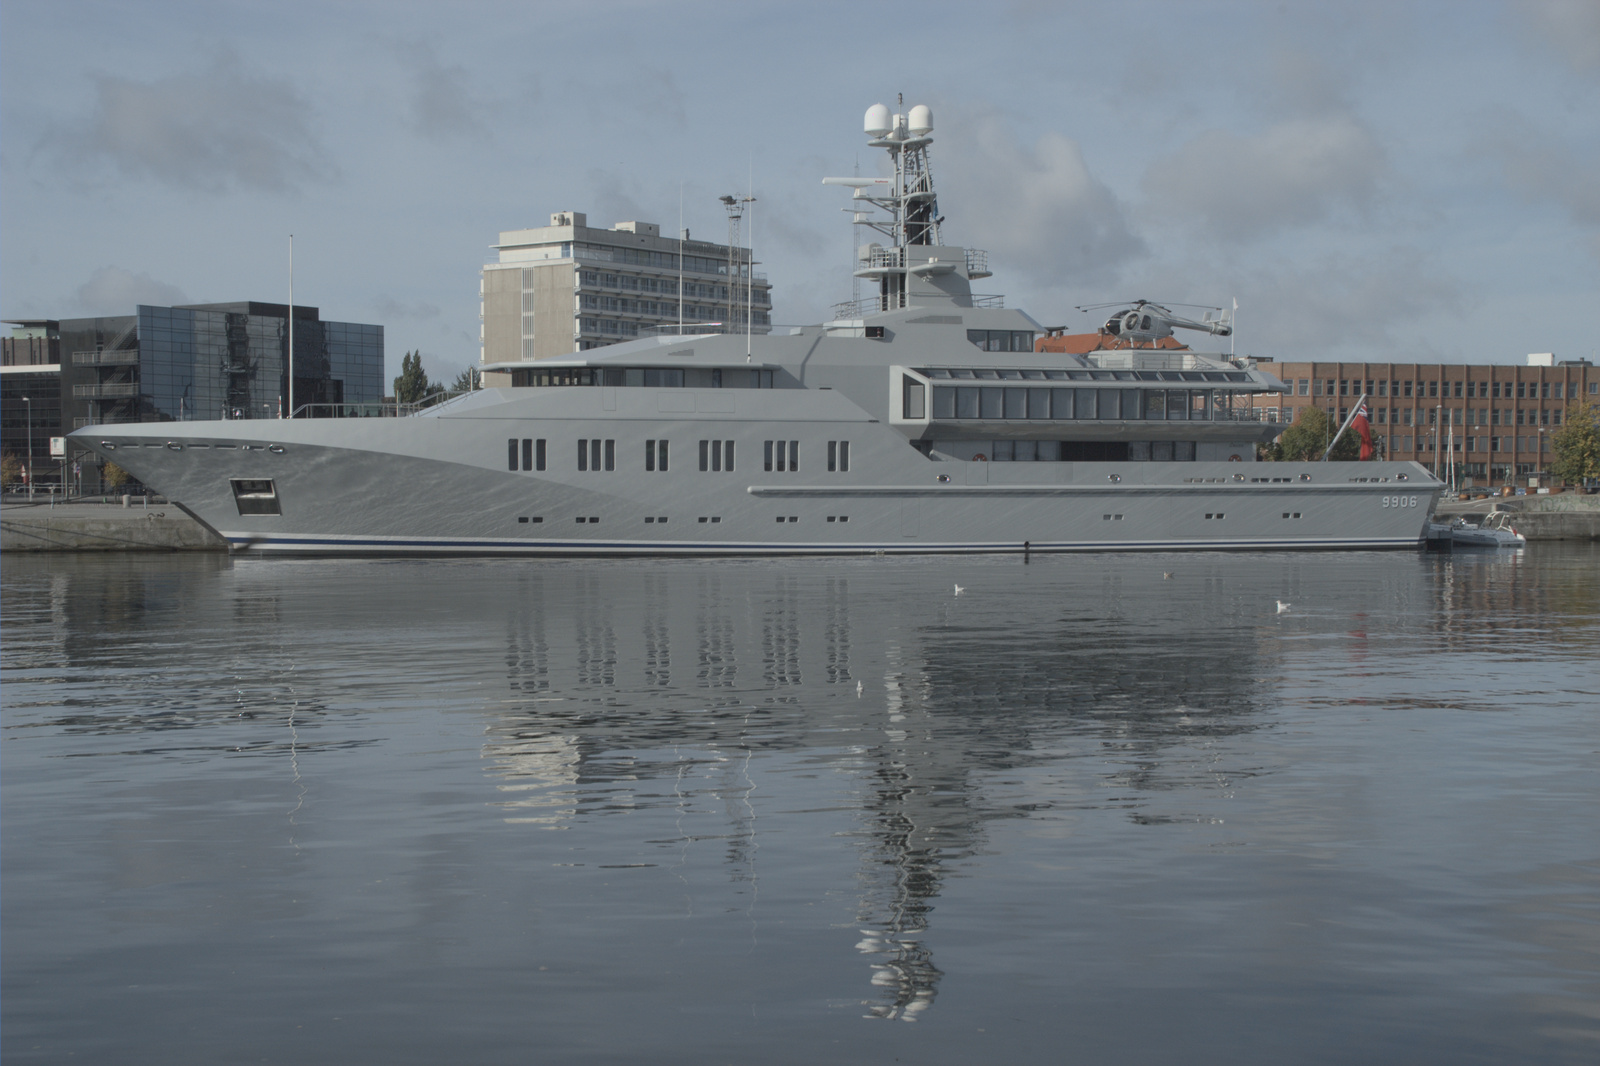
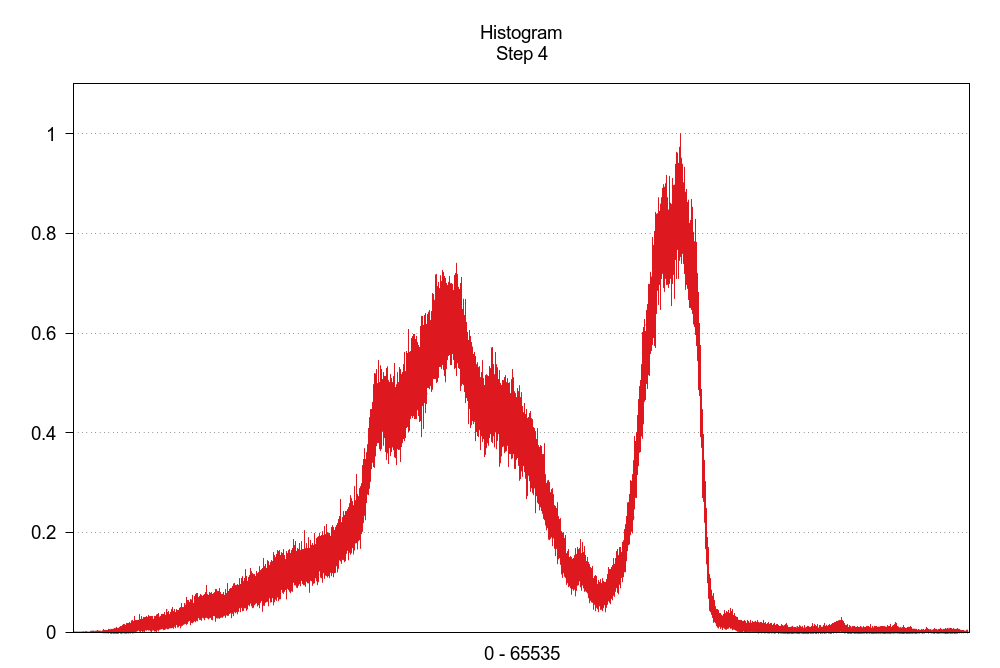
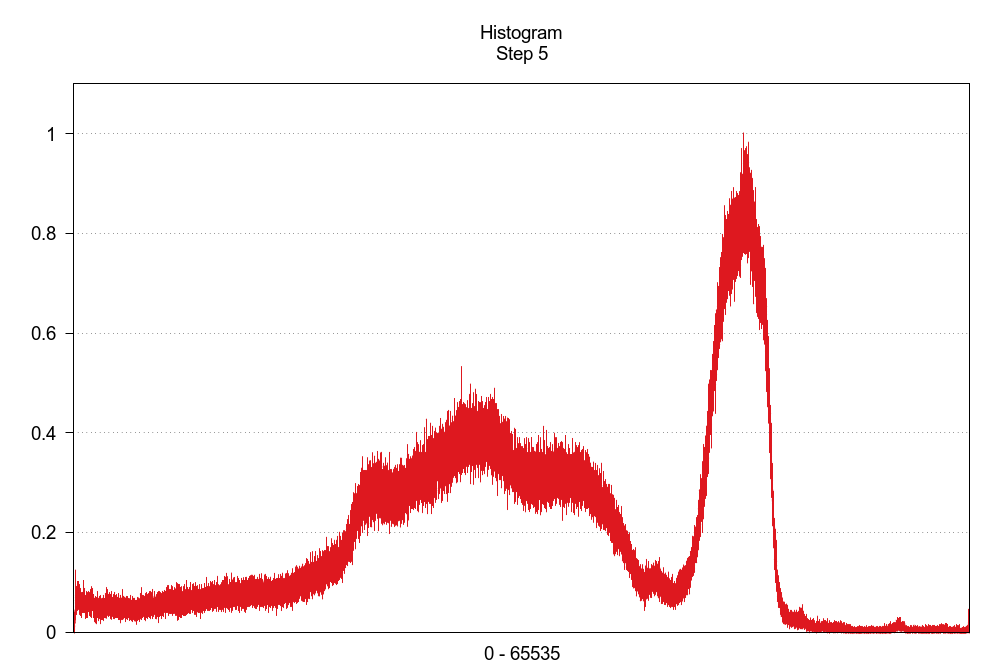
Lines 11-15: Although the image histogram indicates a more-or-less ideal pattern the pixel spread does not encompass the entire range of depth values. Therefore, we need to "normalize" the histogram to move the endpoints to the min/max extremes. This is accomplished by using pnmnorm from NetPBM. But first we need to create a temporary grayscale image (with ppmtopgm) to use in determining the min/max endpoints (with "pamsumm"). The endpoints are then passed to pnmnorm which automatically adjusts the pixels to encompass the entire depth range.
Note that if, by chance, the image does not actually require such adjustment pnmnorm will in such a case leave the image essentially unchanged.
The result of this step is shown next. Notice how the range of the previous histogram has been shifted to include both the minimum and maximum depth values. Note also the change in brightness and contrast of the resulting image.
(click to view full size)
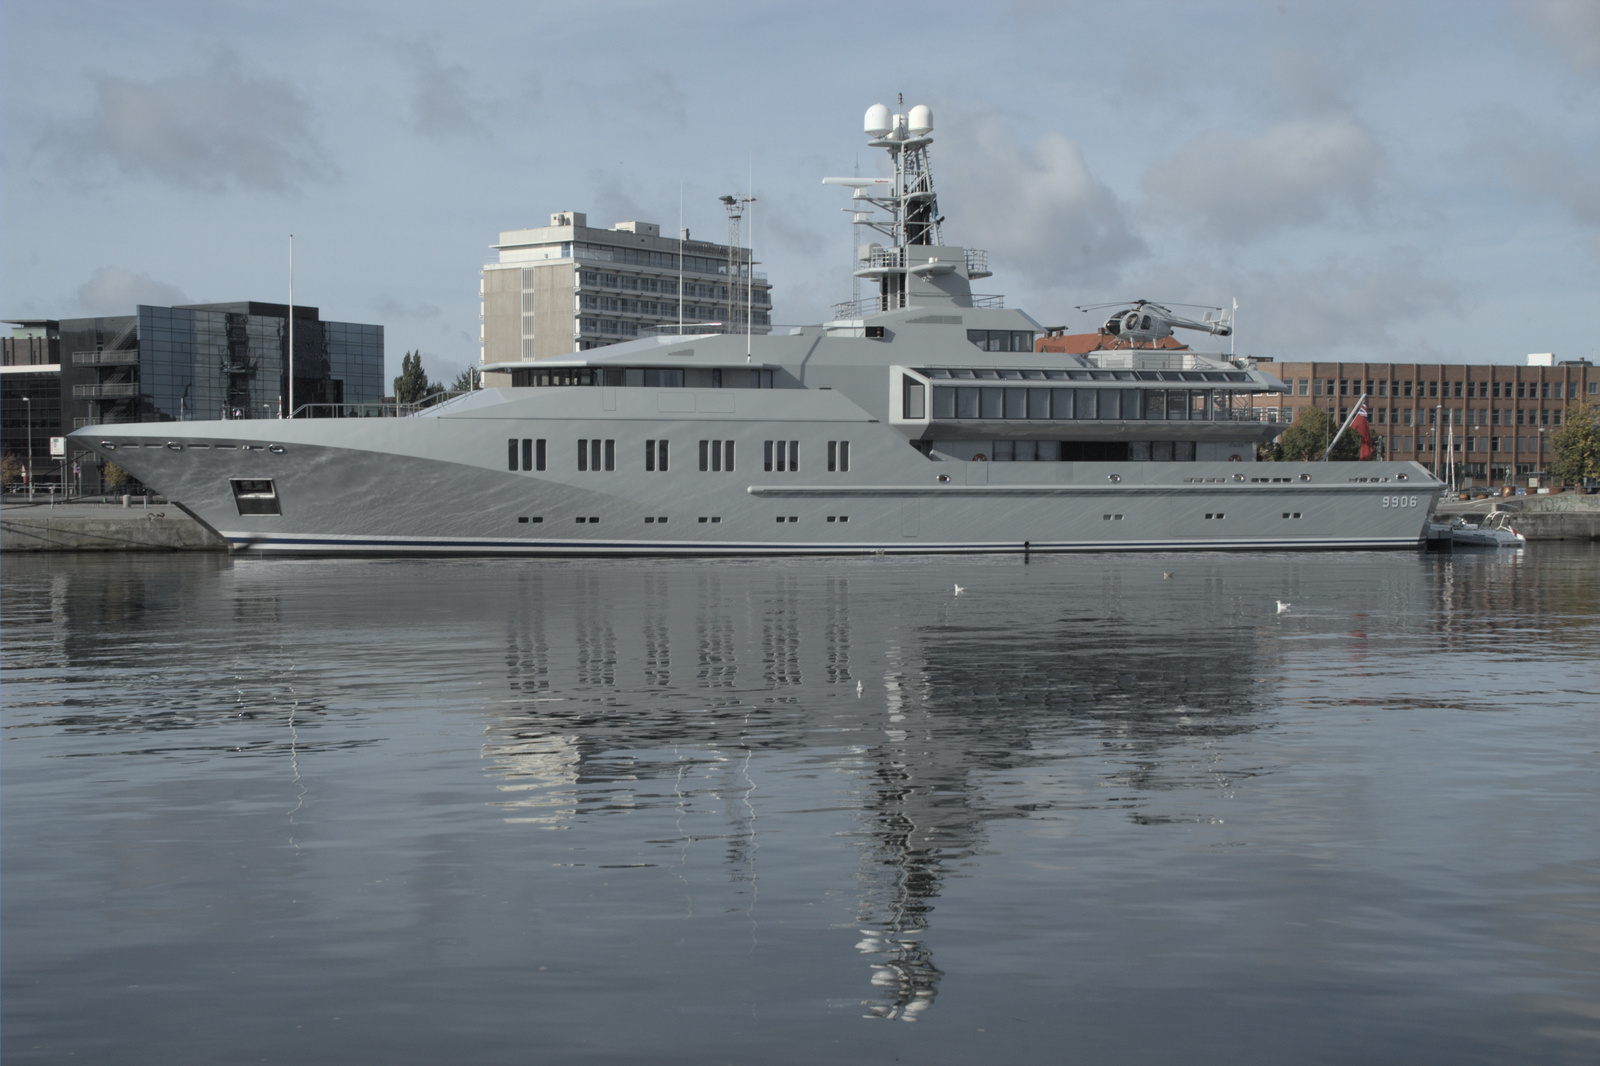
(click to view full size)
Line 17: The image is now essentially complete but the color information is still within the camera color space and hence is not faithful to the original scene. There needs to be a transformation of the color information into either a color space for viewing on a computer monitor or a color space for printing. In this demo the transformation will be done to the standard sRGB space for viewing.
Every color space transformation requires two ICC color profiles: the camera profile and the sRGB profile. It is beyond the scope of this demo to describe color science in any detail and all I will say on the matter is that the first (camera) profile transforms the camera colors into a universal color space (CIELAB, CIELUV, etc.) and the second profile (sRGB monitor) transforms these universal, absolute colors to the sRGB color space. This process results in a faithful reproduction of the original image on the output device (i.e. the computer monitor or printer). For a beginning on color science click here.
With GNU/Linux the Little CMS package contains the tools needed to apply color profile transformations.
The Little CMS tificc utility requires the TIFF image format and thus the previous PPM file is converted appropriately and passed to tificc. The input profile is the proprietary Nikon D100 profile and the output profile is a standard sRGB profile, which is available from many sources.
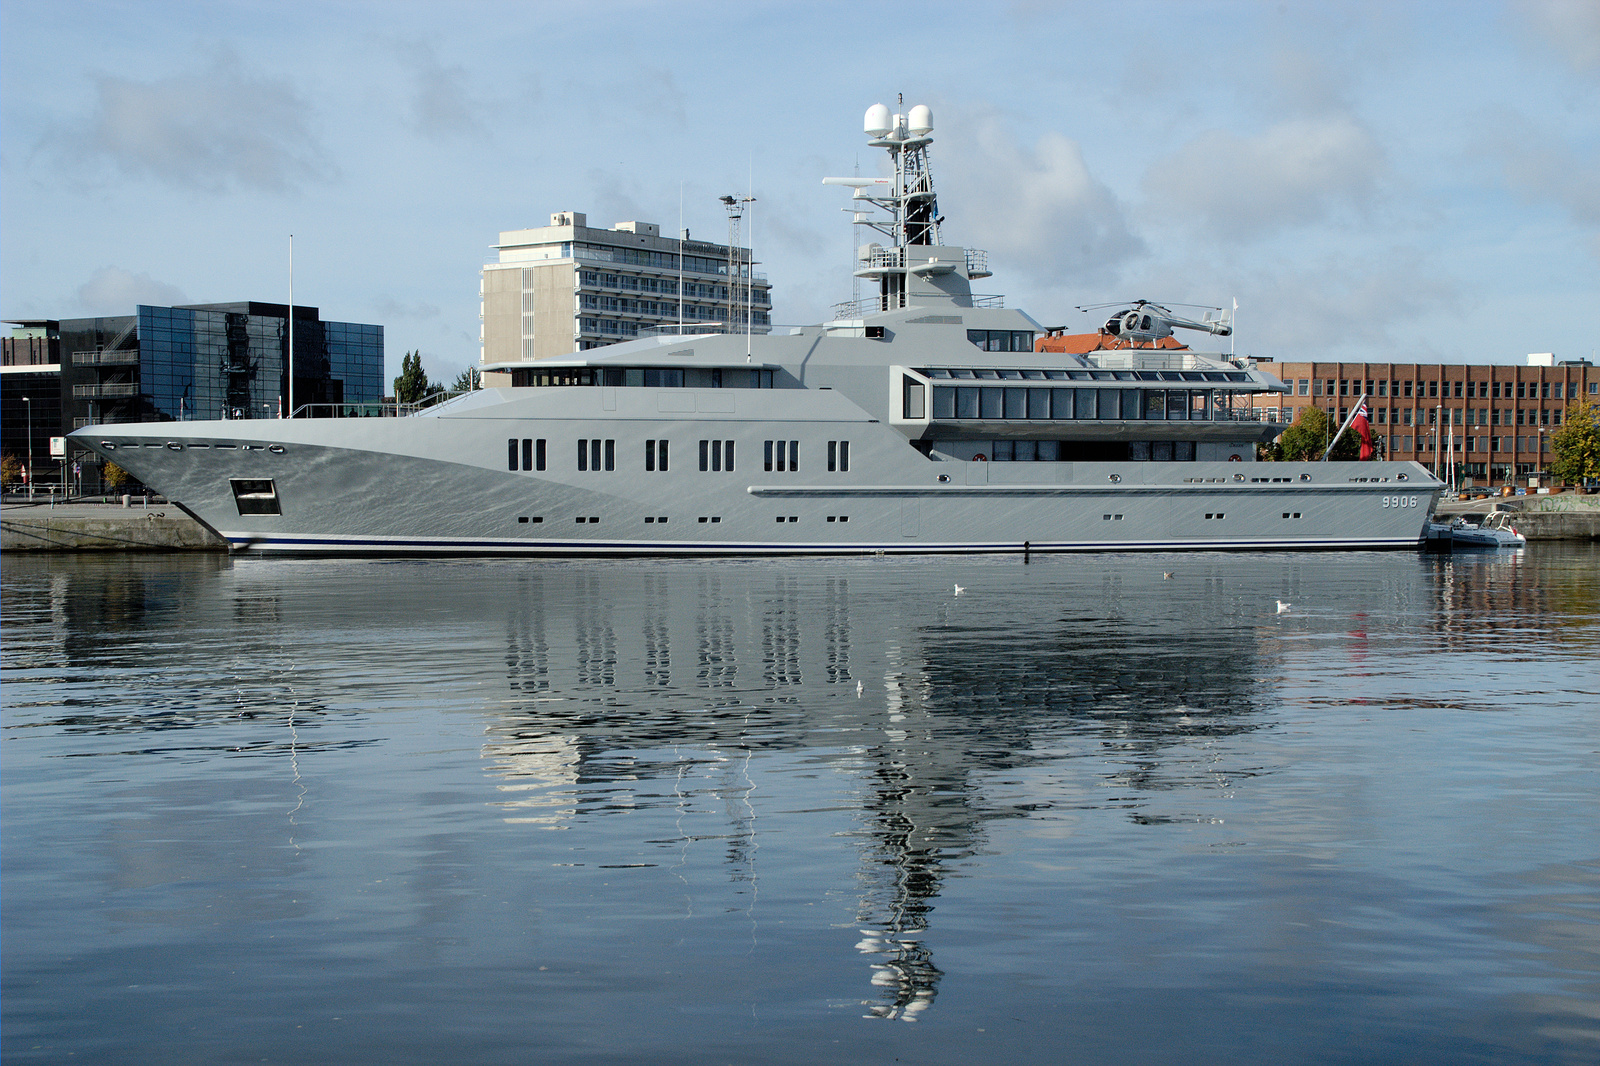
The result of this color space transformation is shown next. Note how the colors have been changed, although only slightly, to faithfully capture the original.
(click to view full size)

(click to view full size)
Lines 19-20: The final processing step first applies an unsharp mask to alleviate the softening caused by the camera anti-aliasing filter. An unsharp mask is not actually a form or sharpening but rather a form of edge accentuation.
GMIC is used here for "sharpening" because NetPBM lacks an unsharp mask (although other NetPBM tools can be combined to effect one).
Since the original image dimensions of 3037 x 2024 are a bit large for viewing on a standard computer monitor the image is reduced using a Lanczos resampling which gives good results. Then, as the last step, the image is converted, or compressed, to JPEG format. GMIC is used for reduction and pnmtojpeg is used for compression (although either one or the other could be use for both).
The final, edge enhanced and reduced, converted RAW image is shown next. Notice that, when compared to the previous step, the image appears to be definitely sharper via the edge enhancement of the unsharp mask.
(click to view full size)
Epilogue
The accurate processing of digital RAW images, if done manually one at a time, can be slow and tedious. The bash script demonstrated here can automate the entire process to allow hundreds of RAW images to be digitally "developed" with complete contrast adjustments and color correction in mere minutes rather than hours.
As mentioned earlier, this automated process almost always results in the best possible outcome for a given RAW image but there can be an occasional sub-optimal result that may require manual editing. It is up to the user to decide.
If nothing else, the delineation of this RAW processing method will shed much light on all of the underlying technical details and also demonstrate the versatility of GNU/Linux/FOSS in the image processing arena.